A crafty holiday that could lead to a potential career change? Set amid the rolling hills of Carmarthenshire in rural Wales, the Traditional Upholstery Workshop in Torcoed Ganol, Porthyrhyd, has been imparting the time-honoured principles of the skill for a quarter of a century.
Craftsmanship and tradition lie at the heart of what this workshop is all about. There are absolutely no shortcuts. Students are encouraged to bring their own pieces of furniture for refurbishment, and master upholsterer Liz Marks, who leads the workshops, will advise participants on the viability of restoring those pieces, based on their level of experience. Everyone is expected to complete at least one chair or another project during their first week, and there is often enough time for the diligent and focused to achieve more.
I undertook a five-day taster course this month – this can then be built into a six-week course, at the end of which you’ll receive a certificate. Students can also work towards various diploma qualifications with the Association of Master Upholsterers. Courses are often fully booked months in advance and are limited to just five students each week, who are guided by two experienced upholstery tutors, so it is all very hands-on and individualistic.
Tuition costs £380 (Dh1,831) per week, plus the cost of materials used during the restoration of your furniture. Since I was travelling from Dubai to the United Kingdom for the course, I decided to consult Facebook Marketplace once I arrived. The site offers an abundance of pre-loved chairs. Beware of items presented as “projects” (which is sellers’ code for pretty distressed and broken-down pieces). These should be avoided as this workshop is less about upcycling and more about restoration to former glory.
Getting started on upholstering
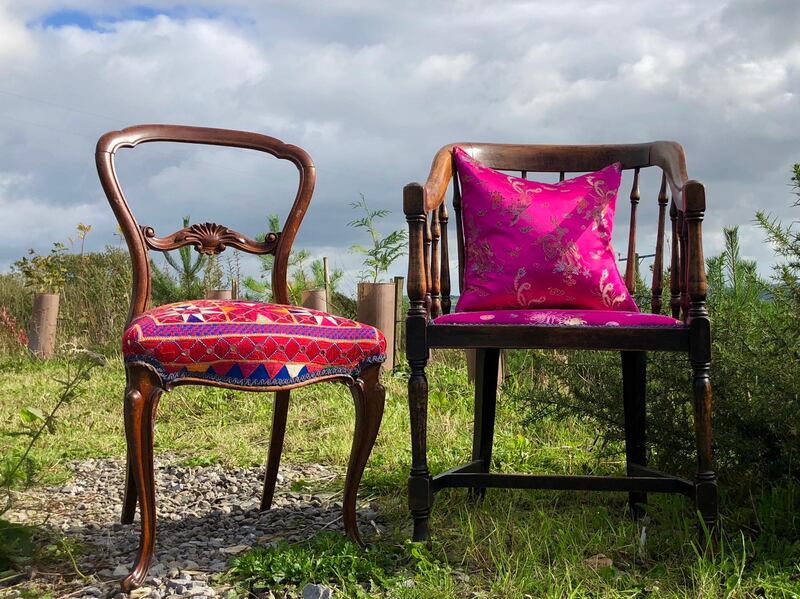
I brought along two chairs I'd purchased from the site the week before for Dh48 each, one a Victorian balloon back and the other a curved spindle back – each more than 100 years old. When in perfect condition, they could easily command a price many times that. The upholstery on both was tatty and flat, but the frames were sturdy and in good condition once cleaned and waxed. Using specialist tools provided by the workshop, I stripped the chairs back to their wooden bones, revealing layers of hessian, horsehair, wool wadding, stitching, webbing and an abundance of pin tacks holding it all together.
There is something strangely moving about picking apart the layers of stitches and horsehair skilfully put together by a craftsman many years ago, whose work has now outlived him. Once the chair’s frame is exposed, reconstruction can begin – and a fascinating slow reveal of the necessary processes for building layer on layer can take place, as Marks directs each stage of the course.
First, webbing, woven together to hold the seat, then a hessian layer, is pin-tacked to the shape onto which the first layer of hairy fill-air fibre is hand-stitched and fluffed with steel needles (in upholstery speak, “regulating”) to give the chair the appearance of an abundant beard. A further layer of hessian tightly stitched over the chair (squashing the beard) redefines the seat’s shape and gives it form. A last layer of mixed hair is stitched in place before calico is introduced to hold it all together. Finally, a fluffy barrier layer is glued in place before the top upholstery fabric is added.
Though the workshop can supply and order material for students, I brought pieces of Chinese silk purchased in Hong Kong 20 years ago, which I'd kept in storage ever since. The fabric for the balloon back chair is a vintage piece of Rajasthani mirror-work I'd sourced in Udaipur last year.
The process took a little over two days for each chair – it might have been faster if my enthusiastic hammering hadn’t knocked one of the chairs off the table, which necessitated additional repair involving wood glue. An angst-filled time for this student of upholstery.
A win-win experience
Emily Edwards, the second tutor in the workshop, told me she could probably accomplish a similar project in “a long day”, charging approximately £160 for labour, plus materials. Edwards continues to take on commissions for private work, but these days likes to apply herself to more challenging pieces. She says she gets “chuffed to bits” when she has larger, unfamiliar furniture to restore and gets into the process of engineering springs and so on.
________________________
Read more:
Crafting a DIY culture in the UAE that will help forge friendships
Dubai's The Home boasts locally made items from the UAE
From village to villa: A room in Dubai made up entirely of fair-trade products
________________________
Students come from all over the world to Carmarthenshire to attend the workshops. What was once a traditionally male craft is now just as popular with women, and nearly 80 per cent of this course’s participants are female. Some might sign up with the intention of just trying something new, having a creative holiday or working on a much-loved family heirloom. But there are many who are looking for some kind of career change or a flexible working opportunity where they can pick up projects to work on from home.
The opportunity to spend time in this beautiful part of the UK while learning a new skill is a win-win. I'm now trawling the internet for a second-hand chaise longue, and I am sure to go back for more.
Upholstery dos and don'ts
- Don't buy anything without sitting on it first. It really is the best test.
- Do invest in quality materials. If you're going to spend time restoring something, make sure it lasts. Foam filler and staples might be a quick fix, but treat your piece of furniture with the respect it deserves. Foam deteriorates over time to crumbly dust – and it isn't fire retardant.
- Do take time to remove all tacks and staples, and use a combination of wood glue and sawdust to fill any gaps and holes; this will save time later. You can't hammer in tacks securely to open holes or over existing pins.
- Do use wire wool and wax to clean down woodwork before you begin. Fabrics and materials will get grubby otherwise.
- Do check for tiny holes of woodworm and treat them. It's easy. Your home might otherwise play unwitting host to new and unwelcome visitors.
- Don't purchase a piece of furniture if the joints are particularly wobbly or unsound, unless you're prepared to put a lot of time into putting it right.
- Don't be too ambitious for your first project. Learning a new skill takes time, and taking on an enormous project before you're ready could quickly kill your enthusiasm. Good results will build skills and confidence.