Summer in the UAE is brutal. When the mercury begins creeping into the high 40s, those of us lucky enough to have air conditioners live our lives tied to them. But what do we do when our bubble of cool comfort bursts and our air conditioners break? Most would call a handyman and ask him to repair it. Some, that elite cadre of DIYers with a hammer, level and a "can do" attitude, make their own. Membership in the DIY club is less exclusive than your handyman or overpaid HVAC specialist would have you believe. Most people simply are too intimidated by power tools, stud finders and square footage to even attempt it. But, with the advent of the internet and handy websites such as www.wikihow.com, DIY is no longer the sole purview of trained professionals.
Some of you are still sceptical. You say: "Anyone can hang a picture frame, but an air conditioner is a complicated piece of machinery." You people are making a classic non-DIYer mistake: you are over-thinking things. Essentially, all you need to do is build something to make the air cooler. You could do this as simply as putting several large buckets of ice around a room. Or, you could do it by pumping ice water from a cooler using an aquarium pump into a coil of copper tubing attached to a desk fan - which is what I did. I cannot take full credit for this ingenious design: greater men than I dreamt it up. But you too can impress friends and family with a few tools, some elbow grease and the following items:
-Copper tubing, approximately 1-1.5 metres in length (Dh45) -Clear vinyl tubing, approximately 1 metre in length (Dh25) -Aquarium water pump (Dh65) -Plastic zip ties (Dh11) -Cooler, preferably styrofoam (Dh99) -Electric fan (Dh54, I used a desk fan but an industrial fan would work better) Finding these items can be a problem in the UAE. Even big hardware chains such as Ace Hardware and True Value only stock one or two of them. What you need to do is locate a building materials supplier. (Residents in Abu Dhabi can visit the hardware district on Najda Street between Electra and Al Falah. Dubai residents are on their own, unfortunately.)
You can find detailed step-by-step instructions below. But if you want to be a true DIYer you'll do what I did, not bother with directions and make life as difficult as possible. Although I eventually got my DIY air conditioner working, it took around two hours to complete, twice as long as it probably should have because of unnecessary mistakes, and it still needs some tweaks to make it work reliably. And it took more time to locate the items than it did to construct it. The end result is a Frankenstein-style piece of machinery that only its creator could love, and the ability to cool anyone standing within a metre of two of the fan. Was it worth the effort? That depends on how dependable your handyman is. If he's reliable and will fix your air conditioner in the space of a few hours, no. If he's chronically tardy or you have a mad scientist's urge to create, then yes.
Step 1: Unless your hardware store happens to stock copper tubing in the exact length, you will need to trim it to a more manageable length using a tubing cutter.
Step 2: If you are like me and purchased a plastic-lined cooler, you will need to drill two holes in opposite sides of your cooler in the approximate diameter of your vinyl tubing. If necessary, widen the hole using a pair of needle-nose pliers.
Step 3: Pull the tubing through the holes you drilled.
Step 4: Seal the tubing in the holes using an epoxy. It is important to ensure that the tube that you attach to the aquarium pump is long enough so that the intake fan is submerged, but not so long that kinks develop in the tubing.
Step 5: Remove the face plate from the electric fan.
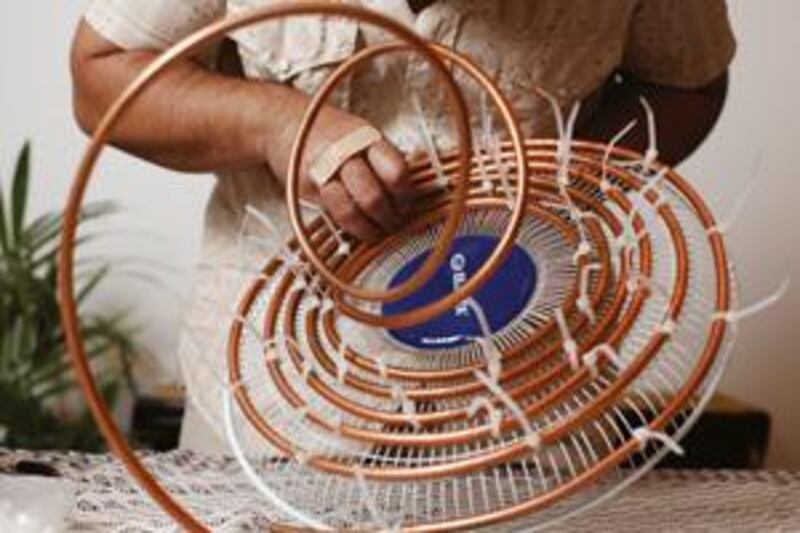
Step 6: Form the copper tubing into a rough spiral shape. Leave a significant portion at the end unshaped to form a final loop to take water back to the cooler.
Step 7: Using plastic zip ties, attach the copper tubing to the fan's face plate.
Step 8: Using the segment of tubing described in Step 6, make one final large loop so that the ends of your tubing are on opposite sides of the fan.
Step 9: Trim the ends of the zip ties.
Step 10: Re-attach the face plate to the fan body and attach the vinyl tubing to the two ends of your copper spiral, trimming the tube length if necessary, but be careful to avoid kinks.
Step 11: Using electrical tape, attach the aquarium pump to one segment of vinyl tubing. Apply the tape heavily as it will need to be both secure and water tight.
Step 12: Fill the cooler with water and ice and turn on your brand new DIY air conditioner.